Well, I forgot to mention how to make the college from last post…(and gotten a few email about it, no less). Here it is:
You will have to download the “BnBig pictures” from PanosFX.com here . While you are there, check out his other cool stuff as well. I was searching for a way to NOT to open 50+ files and copy and paste them into one PSD, and somehow I stumble on a post written by another photographer (unfortunately I can’t find that link anymore….) So, I am sure that I am not the 1st person to use this method, but here are just an example of how I did mine. The “BnBig pictures” is an photoshop action suppose to divided a photo in landscape rotation into 25 layers complete with border and blow a “breeze” over to added rotation in some of the photos. Most people use the 2×3 crop, so the document size 15 x 10 is what I came up with so there will be no extra space around the photos after it was done.
1) Open the folder containing the photos you wish to use in a college in Adobe Bridge. Select up to 25 photos only with the same rotation (all landscape or all portrait) .
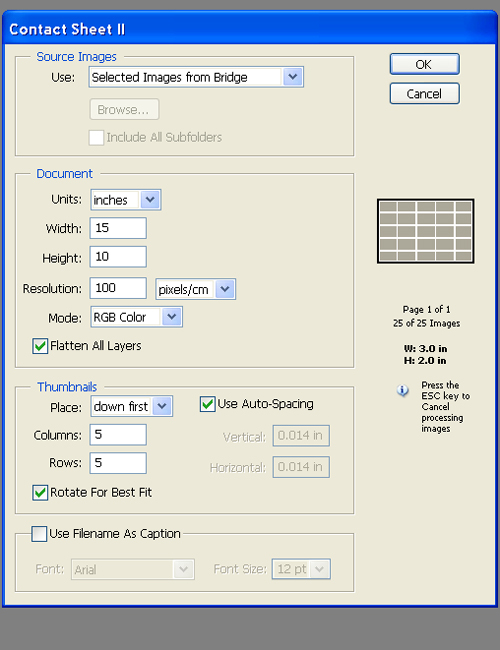
2) Go to “Tool” then “photoshop”, select “contact sheet II”
3) In photoshop, make the document size a square with resolution 200. Here is what I set mine at:

4) After it was done, go to action box and “load action” , load the unzipped BnBig picture action. ( If you don’t know how to load an action please search the HELP from PS or the INTERNET)
5) Resize the image: Document size should be 200 pixels/inch…this will allow the next step to run easier.
6) Apply the “action” from the “BnBig picture” folder.
7) Follow the instruction…and Viola!
Now, if you are like me who like to take a mix of Landscape and Portrait crop photos. Then there is a couple of extra step you will need to do.Make sure you had saved and close the PSD you just created.
1) In Bridge, select 25 photos (the portrait that you would like to include plus other random one…we will not be using these)
Step 2 to 3 as above
4a) When the contact sheet had been produced, you can see that your portrait crop had been rotated. Rotate the whole layer 180 degree.
Follow the above step from Step 5….
Once it was done, rotate canvas 90 degree. Open the other PSD. Make sure the 2 has the same Document size resolution. Move the portrait one to the SAVED PSD, and resize the canvas if you want, nudge and move them around. You should have something like this:

Dress it up further:

UPDATE for CS4
I haven’t install my CS4 package yet..(don’t want to upset my hard drive any further…it made a really scary PING PING DING sound last week when I ask lightroom to export one wedding job (1000+ 8M jpegs) ) but I did got an email regarding the “deleted” contact sheet II function in Bridge CS4.
After some research, this is what I had found out. The contact sheet II function had now been taken off because of the contact sheet PDF in Bridge. However, there is a way to re-install the old function. The following is from photo.net
I know this is an old post but here is a bit more information.
The old plug-in was not installed by default because it’s no longer a fully supported feature (it’s been deprecated as in superseded by new functionality in Bridge). It is, however, still available on the main disk (or disk image) in the “Goodies” folder. Additional plug-ins are also available as well as scripts you can load into Bridge to still call them from Bridge.
If you dont find the old files you can get them here.
(link)
1. From the Photoshop CS4 install disc, drop the ///Goodies/Optional Plug- Ins/Automate/ContactSheetII plug-in into the //Adobe Photoshop CS4/Plug-ins/Automate folder (this is for both Contact Sheet and Picture Package).
2. From the Photoshop CS4 install disc, drop the ///Goodies/Presets/Layouts folder into the //Adobe Photoshop CS4/Presets folder and restart Photoshop.
Optional: To add this legacy functionality back into Bridge (as a menu item):
3. From the Photoshop CS4 install disc, drop the ///Goodies/Optional plugins/ Bridge Startup Scripts/photoshop_contact_sheet_ii folder and the photoshop_contact_sheet_ii.jsx file into following locations and then restart Bridge.
Macintosh: //Library/Application Support/Adobe/Startup Scripts CS4/Adobe Photoshop/
Windows XP: //Program Files/Common Files/Adobe/Startup Scripts CS4/Adobe Photoshop/
Windows Vista: //Program Files (x86)/Common Files/Adobe/Startup Scripts CS4/Adobe Photoshop/
Post was written by Nancy Cuppy.
Hopefully it helps!


Very interesting article I enjoy your site carry on the amazing blog posts